Hi guys. Today, with the prospect of a working group back in the loco shed at Shackerstone again, I decided to head along. I arrived at around 10:30am and preparations were immediately made to begin the days task: "Sir Gomer". The Peckett has had a very good year and performed faultlessly at Shackerstone during the Spring/early Summer season. She hauled many trains filled with happy passengers and many of us enjoyed a good few days aboard her footplate. As the year went on the engine received a repaint and is currently wearing a very smart, plain black livery. She visited the Epping Ongar Railway in November and returned to Shackerstone towards the end of the month to take part in "Santa Special" Station Pilot duties. Unfortunately, on her last day of rostered work, she ran a hot axlebox bearing at the Fireman's side front axlebox. Since then the engine has been in the locomotive shed awaiting repair. So far the engine had been jacked up and packed, and the culprit axlebox brass removed. The brass rides on the top side of the axle and features the two oil-ways that are fed to each box from the mechanical lubricator. For whatever reason, the box has been starved of oil and this has caused the axle to run hot in the brass and cause damage to both the axle and the brass itself. Problems such as this are not entirely uncommon with steam locomotives but they do happen on a rare occasion. For example, "Sir Gomer" hasn't run a hot box for many years but any accumulated muck which causes a restriction in oil flow can easily cause this problem on any locomotive. Indeed, in the past, engines on other railways have run hot boxes in hot weather!
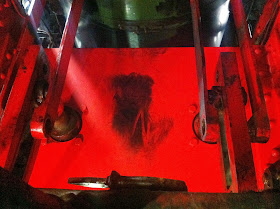
It is, I guess, kind of fortunate that "Sir Gomer" can be repaired over the closed season where she won't be missing out on any booked, revenue earning turns. If the problem had occurred in the summer then we would have had trouble. In order for the repair of the engine to take place, the damaged axle has to be removed and cleaned up in order to bring it cylindrical again and remove any burrs, scars or dips. This is because any false cuts in the axle will obviously bite into the newly repaired/replaced brass and cut it away. Cut away debris can then block the oil holes, causing a hot-box. Its a very vicious circle like that. The axle must also be 'evened up'. Obviously if you turn one side you turn the other as you don't want a smaller axle (even by a tiny tolerance) on one side as there is no fine spring adjustment. In the same vein, if you machine a brass you have to machine the other too: everything has to be even. This way you ensure that the radius in which the axle runs in the brass is kept correct and even, resting the weight across the entire brass rather than across a selected section. OK, so with all this in mind, we set to work. Obviously to remove the axle we need to remove the two connecting rods and all of the coupling rods. The eccentric straps also require removing as we will also be checking the centre axle during this task. Myself & Craig worked in the cramped conditions inside the frames, removing the pins in the lifting links which hold the eccentric straps in place. We worked for an hour or so, labouring away, before the job was done. We can see below that the expansion links are in the lowered (full forward) position and that the lifting links are hanging free. The eccentric straps have been removed so that the engine can be jacked without worrying about bending anything or causing any damage...
On the outside of the engine Carl, Pockets and Reece were hard at work too. "Sir Gomer" is a fairly basic machine as, afterall, Peckett's were designed to be. The big-end and coupling rod brasses (bearings) are made in two halves. The two halves surround the crank pin and are then pushed tightly together using a key which is driven in. Locking bolts then tighten up against the tapered key in order to ensure its full security. The tightness of the key in the gap and the pressure of the bolts against the key hold the two halves of the brass tightly and securely around the crank pin. An oil-way in the top of the brass then allows oil from the well under the cork atop each rod to fall through onto the pin and lubricate it. To remove the connecting rods, the castle nut and key on the gudgeon pin is removed in readiness. The bolts against the key at the opposite end of the rod are then loosened and the key driven out. The brass halves can then be carefully removed and the rod rested very carefully on the pin in order to allow the gudgeon pin to be removed...
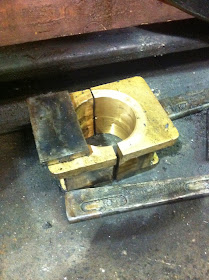
With the gudgeon pin out and brass halves removed, the connecting rod can be very carefully lifted off the engine by a few willing helpers. Below, I've included a picture of the removed brass from this side. Down the centre of the brass can be seen the oil-way and the two holes which provide the oil. The shading down each side of the brass about 1-inch in from each side denotes the radius of the axle and where it has been riding. We can see the cuts in the brass and the damage that has been caused by a lack of oil. The grey patches are actually heavily shaven pieces of brass which are now engrained in the cuts...
A close up of the worst of the damage...
 |
| "Gudgeon Pin Castle Nut and Key Removed" |
The heavy process seemed to take place rather quickly and the fireman's side was soon completely gone (rod wise!). Attention then turned to the equally simple driver's side...
Before long, the engine was stripped on both sides and all of the crank pins were checked for wear. The crank pins all seemed in remarkably good condition, as did their brasses...
 |
| "All Rods Removed and Crank Pins Checked" |
Below, a collection of rods from the fireman's side. From left to right they are the rear coupling rod, the main connecting rod (little end nearest) and the forward coupling rod...
 |
| "Rods Everywhere!" |
 |
| "Coupling Rod Brass" |


Really interesting post Sam, I'm looking forward to reading the next instalment of 'Gomer's' stripdown, like how the axles are going to be dealt with... Seems like you're dismantling a lot of engines this winter ;-)
ReplyDeleteKind regards,
Emma-claire.
Hi Emma. Glad you have enjoyed reading about it. Its the first big work we've had to do for a while so its nice to report on it. Keep reading - I can keep mindlessly dribbling on for a good while. Best Regards
ReplyDelete